
Transform Your Guitar with a Custom Paint Job
· Wolf
Overview
This blog provides a comprehensive guide on preparing your guitar for a custom paint job, emphasizing the importance of proper preparation for optimal paint adhesion and finish. Key steps include gathering materials, removing hardware, cleaning, sanding, masking, applying primer, and choosing the right paint. The guide also discusses the impact of paint on guitar tone and suggests considering professional help for those unsure of their skills. Lastly, it offers creative design ideas to inspire your unique guitar transformation.
Frequently Asked Questions
1. Why is it important to prepare my guitar before a custom paint job?
2. What materials do I need to gather for painting my guitar?
3. What is the first step in preparing my guitar for painting?
4. How does a custom paint job affect my guitar's tone?
5. Should I consider professional help for my guitar paint job?
6. Why should I paint my guitar?
7. What tools do I need to paint my guitar?
8. How do I prepare my guitar before painting?
9. How can I maintain my painted guitar?
10. Why is preparation important for custom guitar painting?
11. How do I disassemble my guitar for painting?
12. What steps should I take to prep the surface of my guitar?
13. Why is it recommended to use a clear coat after painting?
14. Why is sanding important in guitar restoration?
Your guitar is not just an instrument; it’s a reflection of your personality and style. Whether you’re a seasoned musician or a passionate beginner, preparing your guitar for a custom paint job is essential to enhance its aesthetic appeal. This guide will take you through the necessary steps to ensure that your guitar looks stunning while providing optimal performance. Plus, we’ll touch on how a well-executed paint job can even contribute to guitar tone enhancement.
The Importance of Proper Preparation
Before unleashing your creativity on your guitar, it’s crucial to understand why preparation is key. A properly prepped guitar leads to superior paint adhesion and a professional finish. This also includes safeguarding your instrument’s functionality and resonance.
Gather Your Materials
Before diving into the preparation, you need to gather the right materials. Here’s what you will generally need:
- Sandpaper (various grits)
- Masking tape
- Paint stripper (if necessary)
- Primer
- Custom paint (spray or brush-on)
- Clear coat sealant
- Soft cloths
- Protective gear (gloves, masks)
Step-by-Step Preparation Process
Follow these steps to ensure your guitar is ready for its new look.
1. Remove Hardware
The first step in preparing your guitar for a custom paint job is to remove all hardware. This includes the strings, pickups, knobs, and any other components that could interfere with the painting process. It’s essential to keep these parts organized to make reassembly easier later on.
2. Clean Your Guitar
Once the hardware is removed, clean your guitar thoroughly. Use a soft cloth to wipe down the body, neck, and headstock. Pay special attention to any areas with grime or residue, as these can affect the paint's adhesion.
3. Strip Old Paint (if necessary)
If your guitar has an old paint job that you want to remove, apply a paint stripper carefully according to the instructions. Be mindful of the guitar's wood type and finish to avoid damage. After stripping, ensure that you clean the surface thoroughly again.
4. Sand the Surface
To ensure proper bonding of the new paint, lightly sand the entire surface of the guitar. Start with a coarser grit sandpaper and gradually move to a finer grit. This will create a smooth, even surface for the new paint. Remember to dust off all the sanding residue before moving on.
Preparing for Painting
5. Mask Off Areas
Now that your guitar is clean and sanded, use masking tape to cover any areas that you do not want to paint. This includes the fretboard, pickups, and areas around the neck joint. Precision is key; make sure all edges are sealed to avoid paint bleeding.
6. Apply Primer
Applying a good quality primer is a crucial step in ensuring that your custom paint adheres successfully. Use a spray primer for an even coverage and allow it to dry completely before proceeding. Primer not only helps with adhesion but can also enhance the final paint color.
Bringing Your Vision to Life
7. Choose Your Custom Paint
Select the type of paint you want to use for your custom job. Spray paints are easier for beginners, but brush-on paints offer more control for intricate designs. Depending on the color and finish, such as metallic or matte, choose a product that resonates with your style.
8. Apply the Paint
When you’re ready to paint, follow these tips:
- Lightly coat in even strokes.
- Allow each layer to dry before applying another.
- Consider multiple layers for richer color.
Ensure that you maintain a clean workspace to avoid dust and debris settling on your freshly painted guitar.
Final Touches for Durability
9. Clear Coat Application
Once your paint has dried completely, apply a clear coat sealant to protect your custom design. This will add a glossy finish and safeguard your guitar against scratches and nicks. Allow the clear coat to cure fully before handling the guitar.
10. Reassemble Your Guitar
After everything has dried and cured, it’s time to reassemble your guitar. Carefully put the hardware back in place, string it up, and make any necessary adjustments to ensure optimum performance.
Consider Professional Help
While DIY painting can be immensely rewarding, it’s worth noting that professional services like affordable guitar refinishing in Austin can provide an exceptional level of expertise. If you’re uncertain about your painting skills or want to achieve a specific aesthetic, a professional can ensure that your guitar looks and sounds its best.
Guitar Tone Enhancement Through Aesthetics
You might be wondering how a custom paint job impacts your guitar's tone. While the primary function of a paint job is cosmetic, you should consider the weight and finish of the materials used. Heavier finishes can dampen vibrations, affecting the overall tone. Thus, it’s essential to strike the right balance between aesthetics and acoustics for maximum guitar tone enhancement.
Inspiration for Your Custom Design
Creative Ideas to Boost Your Guitar’s Style
Here are some unique ideas to inspire your custom guitar paint job:
- Nature-Inspired Designs: Think floral patterns or landscapes.
- Abstract Art: Go bold with splashes of color and geometric shapes.
- Band Logos or Personal Branding: Showcase your musical identity.
- Vintage Finishes: Aged wood or retro color palettes can give a timeless feel.
Your guitar represents you and your music; let it tell your story through every brushstroke or spray pattern.
Why Paint Your Guitar?
Before diving into the essential tools, let's briefly discuss why you might want to paint your guitar. A fresh coat of paint can bring new life to an old instrument or allow you to express your individuality. A well-painted guitar not only boosts its visual appeal, but it can also correlate with sound quality—in some cases, enhancing a guitar pickup with glassy highs. You can elevate your playing experience with a uniquely styled instrument that resonates with your personality and invites others to take notice.
Gathering Your Essential Supplies
The first step in successfully painting your guitar is gathering the right supplies. Here are the key tools you shouldn't overlook:
1. Sandpaper
Sanding your guitar is an important step for achieving a smooth finish. You'll need different grits—from coarse to fine—to prepare the surface properly. Start with a lower grit to remove the existing finish and work your way up to a higher grit for smoothing. This will ensure that your new paint adheres well and looks flawless.
2. Primer
A good primer can significantly improve the final result of your paint job. Priming helps the paint stick to the guitar body and reduces the number of paint coats required. Make sure to choose a primer compatible with the type of paint you're using for best results.
3. Paint
Choosing the right paint is crucial. Guitar painting requires specialized paints that offer durability and finish. Look for acrylic or nitrocellulose paints that are designed specifically for musical instruments. The right paint will complement the vibrancy and character of your guitar body, allowing its true beauty to shine through.
4. Clear Coat
After applying the paint, a clear coat is essential. This protective layer not only adds shine but also protects your artwork from scratches and other wear and tear. Aim for a high-quality clear coat that offers UV protection, as exposure to sunlight can fade the paint over time.
5. Paint Brushes and Sprayers
The tools you use to apply paint greatly influence the finish of your guitar. If you prefer a detailed approach, using paint brushes with various sizes will allow you to reach intricate areas. Alternatively, a paint sprayer can produce a smooth, even coat without brush strokes. Whichever method you choose, ensure your tools are clean and appropriate for the type of paint you've selected.
Continued Preparation: Other Essential Tools
Aside from the primary painting supplies, there are additional tools that can enhance your guitar painting process:
6. Masking Tape
Masking tape is invaluable when it comes to protecting areas of your guitar that you don’t want to paint. Use it to cover the fretboard, pickups, and any hardware that might get splattered during your painting session. This will ensure clean edges and preserve important components of your guitar.
7. Drop Cloth or Old Newspapers
Painting can get messy, so protect your workspace by spreading out a drop cloth or old newspapers. This will help you avoid putting paint on surfaces you don't want to damage and makes cleanup easier.
8. Gloves and Respirator
Protecting yourself is just as essential as protecting your instrument. Wear gloves to keep your hands clean and a respirator to avoid inhaling fumes, especially when working with sprays. Safety should always come first during any DIY project.
9. Ruler or Straight Edge
Precision is key when it comes to painting designs on your guitar. A ruler or straight edge can help in measuring areas for intricate patterns or straight lines. This will elevate the overall appearance of your guitar and make your artistic vision come to life.
The Painting Process Explained
Now that you have your essential tools ready, it’s time to dive into the painting process. Follow these simplified steps to ensure a successful outcome:
1. Prepare the Guitar
Begin by disassembling the guitar, removing the strings, pickups, and any hardware that could be damaged during the painting process. Once that’s done, sand down the existing finish to create a rough surface for the paint to adhere to.
2. Clean the Guitar Body
After sanding, make sure to clean the guitar body thoroughly. Dust and debris can ruin your paint job, so use a damp cloth to wipe down the surface. Let it dry completely before moving on to priming.
3. Apply Primer
Using your spray can or brush, apply a coat of primer evenly across the guitar body. Make sure to follow the manufacturer’s instructions regarding drying time, and sand lightly between coats if necessary for the best results.
4. Paint Your Guitar
Once the primer is dry, it’s time for the fun part—adding color! Apply thin coats of paint, allowing each coat to dry before applying the next. Patience is key; it’s better to go slow and steady to achieve a brilliant finish.
5. Add Clear Coat
After you’re satisfied with the paint job, apply a layer of clear coat for protection and shine. Just like the paint, apply it in thin coats and allow ample drying time between each layer.
Add That Final Touch of Creativity
Once your paint job is complete and dry, you can’t forget to personalize your guitar! Consider adding stickers, decals, or even a custom design that tells your unique story as a musician. Whether you live in Austin and want to pay tribute to the vibrant music scene or wish to incorporate personal elements, let your creativity flow.
The Importance of Care and Maintenance
After all that hard work, it’s essential to care for your newly painted guitar. Regular cleaning with appropriate materials will help keep your instrument looking fresh. Avoid exposing your guitar to extreme dehydration or humidity, and be mindful of where you store it. Protect your investment so that your art continues to shine, complementing the beautiful guitar pickup with glassy highs within.
Step 2: Taking Apart Your Guitar
The next step is to carefully disassemble your guitar. This means removing all parts that could interfere with the painting process or be damaged by paint.
Remove Hardware and Electronics
Start by removing all hardware, including:
- Pickups – Especially the Telecaster guitar pickups, as they are sensitive to paint and solvents.
- Bridge
- Tuning pegs
- Controls and wiring
For electronics, it’s advisable to label wires and screws as you go, making it easier to put everything back together later.
Take Off the Strings
Don’t forget to remove the strings! This is essential not only for painting but also to prevent any accidental damage to the neck and body while working.
Step 3: Prep the Surface
Once your guitar is all disassembled, the real preparation begins. This step is crucial for achieving a flawless finish.
Cleaning the Surface
Use a cleaning cloth to wipe down the guitar body, removing dust, oils, and any debris. If your guitar has a glossy finish, a dedicated guitar cleaner may work best.
Removing Old Paint or Finish
If you are repainting an existing finish, you might need to strip old paint or lacquer. Make sure to use a paint stripper safe for guitars, following the manufacturer's instructions. Always wear gloves and work in a well-ventilated area!
Sanding the Body
Now it’s time to sand! Begin with a coarser grit sandpaper (around 120-grit) for general roughening. Follow up with a finer grit (220-grit) to smoothen the surface. Sanding helps the new paint adhere well and also creates a uniform texture.
Step 6: Choosing Your Topcoat Color
With the surface primed and ready, it’s time to think about colors! Your choices can reflect your personality – whether you want bold and bright, deep and moody, or something subtle and classic.
Finding the Right Color
When deciding on a color, consider the following:
- The overall aesthetic you're going for.
- What compliments the Telecaster guitar pickup and other hardware.
- Durability and finish type, such as matte vs. gloss.
Testing Colors
Before you commit, consider testing the color on a small, hidden section of the guitar body or on a scrap piece of wood. This way, you'll get an idea of how the color looks in different lighting and how it adheres to the surface.
Step 7: The Big Moment - Painting Your Guitar
Now that your guitar is prepped and you’ve chosen your color, it’s time to paint! Following the primer process, apply your chosen topcoat using similar techniques:
Applying the Paint
Consider the following steps:
- Shake the paint can well before use.
- Hold the can at the recommended distance and spray in light, even coats.
- Allow adequate drying time between coats – usually 15-30 minutes for most spray paints.
- Apply multiple thin coats rather than one heavy coat to avoid drips and runs.
Patience is key! Rushing this step can lead to an unwanted finish.
Reassembling Your Guitar
After allowing enough time for the final coat to cure, it’s time to reassemble your guitar. Ensure that everything is clean and dry before returning components to their rightful place.
Carefully Reinstall Each Element
Using the labels you made earlier, reconnect the wiring, screw in the hardware, and re-string your guitar. Pay special attention to the Telecaster guitar pickup positioning to ensure optimal sound quality.
Why Sanding Is Essential in Guitar Restoration
Sanding serves multiple purposes during the restoration of guitars. From removing old paint to preparing the surface for a flawless finish, it is an indispensable step in any restoration project. Let's look at some specific reasons why sanding is essential:
1. Removing Surface Imperfections
Over time, guitars may develop scratches, dents, and wear that affect their appearance and performance. Sanding helps remove these imperfections, providing a flat and even surface. This is particularly crucial for players who value aesthetics and sound quality alike, as a smoother surface facilitates better resonance and tuning stability.
2. Preparing for Custom Guitar Paint
When restoring a guitar, one may opt to give it a fresh coat of paint. For a polished look and feel, sanding before applying custom guitar paint is vital. Sanding not only helps in adhesion but also ensures that the paint goes on smoothly. A well-prepared surface avoids problems like peeling or bubbling, which can mar the final appearance of the instrument.
3. Enhancing Finish Quality
The finish of a guitar plays a huge role in its tonal characteristics. Sanding helps smooth out the surface which allows finishes—whether lacquer, polyurethane, or oil—to sit evenly. An even distribution of finish contributes to that sought-after clean Americana guitar tone, as a better application will enhance the guitar's natural tonal qualities.
4. Shape and Contour Restoration
Guitars are designed with precise contours and curves that affect their playability. Over time, these shapes may become compromised. Sanding is pivotal in reshaping and refining contours, ensuring that the guitar feels comfortable in a player’s hands. Properly contoured guitars enhance playability and allow for better projection of sound.
Common Sanding Mistakes to Avoid
Sanding might seem intuitive, but some common pitfalls can lead to unsatisfactory results. Be mindful of these mistakes to ensure your guitar restoration is a success:
1. Using Too Much Pressure
A common error that many make is applying too much pressure during sanding. This can create uneven surfaces or damage the wood. Light and consistent pressure is key.
2. Skipping Grits
Many restorers jump from a coarse grit directly to a fine grit, believing it will save time. However, skipping grits can leave scratches or marks on the surface that will remain visible even after finishing.
3. Ignoring Safety
Sandpaper dust can be harmful if inhaled, so it’s essential to wear a dust mask and safety goggles. don’t overlook this crucial aspect of the process.
After Sanding: What’s Next?
After completing the sanding process, the next steps are equally important to ensure a successful restoration project. Here’s what you should do:
1. Applying Finish
Choosing the right finish based on your desired tone and look is vital. Whether it’s a lacquer or an oil finish, apply it carefully, layer by layer. Take your time to ensure that each layer is evenly distributed and dry, enhancing both beauty and sound.
2. Reassembly
If you’ve disassembled your guitar for the sanding process, ensure that all components are replaced carefully. Check connections, hardware, and electronics to guarantee everything is in optimal working condition.
3. Final Adjustments
After reassembly, fine-tune your guitar. Adjust the action, intonation, and neck relief to optimize playability. This step is essential to achieve that perfect clean Americana guitar tone.
The Importance of Clear Coating
Clear coating is a protective layer that seals and safeguards your painted guitar body. It plays a crucial role for several reasons:
- Protection Against Damage: Clear coats provide a shield against scratches and dings, keeping your artistic designs safe.
- Enhanced Durability: A good clear coat can help prolong the life of your paint job and reduce the risk of fading.
- Improved Aesthetics: A glossy finish can enhance the vibrancy of paint colors, making them pop.
- Sound Quality: The right clear coat can contribute to an improved articulate guitar tone by preserving the resonance of the wood.
Choosing the Right Clear Coat
When it comes to clear coating, options abound. Here are the most common types you’ll encounter:
Polyurethane
Polyurethane is popular among guitarists for its durability and resistance to moisture. It comes in various sheens, from matte to glossy, allowing for customization based on your aesthetic preference. Moreover, polyurethane clear coats can enhance the clarity of the painted surface, helping to project the articulate guitar tone beautifully.
Catalyzed Lacquer
Catalyzed lacquer is another robust option, known for its fast-drying capabilities. It generally offers a hard finish and a luxurious sheen. This choice is favored by many custom guitar builders due to its excellent clarity and beautiful appearance. However, it requires skill to apply since it needs a controlled environment to prevent imperfections.
Acrylic Lacquer
Acrylic lacquer is favored for its ease of application and relatively low toxicity. It dries quickly and can provide a beautiful, glossy finish. While it may not offer the same level of durability as poly, it is simpler to work with for beginners and can still result in stunning aesthetics.
Step-by-Step Process for Clear Coating Your Guitar
Now, let’s delve into the best practices for applying a clear coat to your freshly painted guitar:
1. Prepare the Workspace
Set up in a well-ventilated area to prevent inhalation of fumes. The workspace should also be dust-free to avoid imperfections in your clear coat. It’s essential to maintain a controlled environment, especially when working with lacquer.
2. Sand the Guitar Surface
Start by lightly sanding the painted surface using fine-grit sandpaper (between 800 to 1200 grit). This step helps create a proper surface for the clear coat to adhere effectively. Make sure to wipe down the surface with a clean, damp cloth to eliminate any dust or debris.
3. Mask Off Areas
Use masking tape to cover areas of the guitar that you do not want to coat, such as pickups, hardware, or any other components. Precision in this step will ensure that only the intended surfaces receive the clear coat.
4. Apply the Clear Coat
For an even application, hold the spray gun or can approximately 12-14 inches away from the surface. Apply the clear coat in thin, light coats. It's better to apply multiple thin layers rather than one thick layer to avoid dripping. After applying the first coat, allow it to cure according to the manufacturer's recommendations.
5. Sand Between Coats
Once the first coat is dry, lightly sand the surface with finer grit sandpaper (around 1500 to 2000 grit) to remove any imperfections. Repeat the clear coating process, applying additional coats (generally 2-4 coats total). Always allow for drying and curing time between each coat.
6. Final Sanding and Polishing
After the last coat has cured properly, you may want to perform a final sanding with ultra-fine sandpaper (2000 grit or finer) for a perfectly smooth surface. Follow up by polishing the surface to achieve the desired shine.
Maintenance Tips for Your Clear Coated Guitar
Once you’ve successfully applied a clear coat, the work doesn’t stop there. Maintenance will keep your guitar looking great while ensuring its performance:
- Cleaning: Use a soft, lint-free cloth to clean the surface regularly. Avoid abrasive materials that might scratch the clear coat.
- Storage: Keep your guitar in a controlled environment, away from extreme temperatures and humidity to prevent damage.
- Regular Inspections: Check for any signs of wear or damage in the clear coat. Attending to small chips early can save you from larger issues down the line.
Preparing for Your Guitar Makeover
Before you dive into painting, preparation is key. Follow these steps to set yourself up for success:
Gather Your Supplies
You’ll need various tools and materials to get started:
- Sandpaper (240-grit and 600-grit)
- Primer (spray paint is ideal)
- Topcoat paint in your desired color
- Clear coat finish
- Masking tape
- Paintbrush or spray gun
- Rags and gloves
Choose Your Workspace
Find a well-ventilated workspace that is free from dust. An ideal location would be a garage or outdoor area. Cover the surrounding surfaces with a drop cloth to catch any paint overspray.
Disassemble Your Guitar
Before painting, disassemble your guitar. Remove strings, pickups, and any hardware that you don’t want to paint over. Take care not to damage any components, and keep track of where everything belongs. This is also an excellent time to inspect your Telecaster pickups and clean them if necessary.
Tips for a Successful Guitar Paint Job
To ensure you achieve the best results, consider the following tips:
- Patience is Key: Don’t rush the process. Allow each layer sufficient time to dry.
- Work in Thin Layers: It’s better to apply several thin coats than one thick one, which can lead to runs.
- Practice Techniques: If you're using a spray gun, practice on a piece of cardboard before applying paint to your guitar.
Preparation is Key to Success
One of the primary factors in successful guitar painting is the preparation process. If your guitar isn’t prepped correctly, issues can arise during and after painting. Here are some common prep-related issues and how to fix them:
Ignoring the Surface
Before you start painting, it's crucial to address the surface of the guitar. Failure to clean and sand the surface can lead to peeling and uneven finishes.
- **Clean Thoroughly**: Use a damp cloth to remove dust, oils, and grime. Consider using a specialized guitar cleaner.
- **Sand the Surface**: Use fine-grit sandpaper to scuff the finish lightly. This promotes better adhesion for the new paint.
Improper Masking
If you’re attempting to paint only specific areas, improper masking can result in paint bleeds. To achieve crisp lines, follow these tips:
- **Use Quality Tape**: Invest in painter's tape that adheres well and leaves clean lines.
- **Seal the Edges**: After applying tape, seal the edges with a clear coat or a similar product to prevent bleed-through.
Understanding the Paint Types
The type of paint you choose can dramatically affect your results. If you're working on guitar refinishing, make sure that you are well-informed about the right products for the job.
Choosing the Wrong Paint
Using the wrong type of paint for your guitar can lead to several issues such as cracking, fading, or poor adhesion. To ensure optimal results, consider the following:
- **Select Quality Guitar Paint**: Look for paints specifically designed for guitar finishes. They often come in nitrocellulose or polyurethane options.
- **Test for Compatibility**: For refinishing, always do a patch test to ensure that the new paint bonds well with the underlying finish.
Improper Mixing and Thinning
When mixing paint, incorrect ratios can lead to a wide array of issues, from poor application to finish inconsistencies. Keep these tips in mind:
- **Follow Manufacturer Instructions**: Every paint type has specific mixing and thinning instructions that should be adhered to.
- **Use the Right Thinner**: If thinning is required, make sure to use the recommended thinner for the paint you are using.
Avoiding Application Errors
Once your guitar is prepped and your paint is ready, the application stage is where finesse and technique come into play. Missteps in this stage can be frustrating, but they aren’t the end of the world.
Inconsistent Spraying Technique
When spraying paint on your guitar, maintaining a consistent technique is crucial. Uneven application can lead to patchiness, runs, and drips. Here’s how to maintain control:
- **Practice on Scrap Material**: If you’re new to spraying, practice your technique on a scrap piece of wood to gain confidence.
- **Maintain Distance**: Keep the spray can or spray gun at a consistent distance from the surface—typically around 6-10 inches depending on the tool used.
Humidity and Temperature Factors
Environmental conditions play a significant role in the painting process. High humidity or extreme temperatures can cause problems like bubbling or an uneven finish.
- **Work in Controlled Conditions**: If possible, paint in a garage or workshop with temperature control.
- **Monitor Humidity Levels**: Aim to paint when humidity is below 70% to prevent moisture from affecting the finish.
Addressing Common Paint Issues
Peeling Paint
If your paint is peeling, it often indicates a lack of proper adhesion. To troubleshoot:
- **Strip the Existing Finish**: If peeling occurs, removing the paint and starting fresh may be your best option.
- **Properly Sand the Surface**: Ensure every last bit of old paint is sanded away to promote bonding.
Bubbling and Blushing
Bubbles or blush (a milky appearance) in the finish can spoil an otherwise perfect guitar paint job. This can be caused by moisture or improper curing conditions:
- **Allow Adequate Drying Time**: Ensure enough drying time between coats and before reapplying if necessary.
- **Use a Heat Gun**: In some cases, gently applying warmth can help eliminate bubbles or blushing.
Ensuring a Professional-Looking Finish
As you near the finish line of your guitar painting project, it’s important to understand the final touches that can make a difference between a DIY look and a professional finish.
Sanding and Polishing
Once the last coat has cured, fine sand and polish the surface to achieve a glossy, smooth finish. Here’s how:
- **Wet Sand**: Using very fine sandpaper (around 2000 grit), wet sand the surface to remove imperfections.
- **Polish with Quality Products**: Use a polishing compound specifically designed for guitars to create a high-gloss finish.
Fretting Over the Small Details
Pay attention to small areas such as around the pickups, control plate, and neck joint. Neatness counts!
- **Precision Work**: Use a brush or a small tool to ensure these areas are meticulously painted and finished.
- **Final Inspection**: Before reassembling your guitar, do a thorough inspection for any flaws that may need addressing.
Necessary Materials and Tools
Before diving into the painting process, you should gather your materials and tools. Here’s what you will need:
- Sandpaper: Choose various grits to prep the guitar surface (80, 220, and 400 grit).
- Primer: A good-quality primer helps the paint adhere better.
- Paint: Use high-quality spray paint or acrylic paint designed specifically for guitars.
- Clear Coat: A durable clear finish shields your artwork.
- Masking Tape: Perfect for protecting areas you do not want to paint.
- Brushes or Airbrush Kit: Depending on your painting technique.
- Drop Cloth: To protect your work area.
Finishing Touches
Clear Coat Application
After you’re satisfied with your paint job and it has completely dried, it’s time to apply the clear coat. This will protect your artwork from scratches and chips, ensuring it lasts for years to come. Again, apply in thin, even layers, allowing each layer to dry thoroughly before adding the next.
Reassembly of Your Guitar
Once the clear coat is cured, you can start reassembling your guitar. Carefully reinstall all the components, ensuring that everything is fitted correctly and securely. This is also a good time to check if any electronic components need cleaning or replacing, especially if your guitar has been used extensively.
Understanding Why Paint Stripping is Necessary
Before diving into the techniques, it’s crucial to understand why you might want to strip the paint off your guitar. Old paint can lead to various problems, including performance issues, aesthetic damage, and possibly even decreased resale value. Moreover, some layers of paint may conceal wood imperfections that could affect sound quality.
Signs That Your Guitar Needs a Paint Stripping
Recognizing the signs that your guitar requires a makeover is essential:
- Peeling or Cracked Paint: This indicates poor adhesion and can affect the overall look.
- Prolonged Exposure to Weather: Sun or moisture damage can warp the finish over time.
- Restoration Projects: Vintage guitars often need paint stripping during restoration to maintain their value.
- Personal Preference: Sometimes, a fresh look or color is all you need to feel inspired again.
Techniques for Stripping Old Paint
There are several methods to choose from when it comes to removing paint from your guitar. Each technique has its advantages and challenges, but all can be performed successfully with some care and patience.
Heat Method
This is one of the most straightforward methods for stripping paint off your guitar. A heat gun or even a hairdryer can be utilized to soften the paint, making it easier to scrape away.
- Preparation: Start by removing all hardware from the guitar, including pickups, strings, and the neck if possible.
- Heating: Aim the heat gun at the painted surface, keeping it at a distance to avoid scorching the wood.
- Scraping: Once the paint bubbles or softens, gently scrape it off with your scraper. Be cautious to protect the underlying wood.
Chemical Stripper
Chemical paint strippers are effective but come with their own set of precautions. If you opt for this method, ensure the workspace is well-ventilated.
- Application: Apply the stripper using a brush, following the manufacturer's instructions for dwell time.
- Scrape Off: Use a plastic scraper to cautiously remove the softened paint.
- Neutralizing: Ensure to neutralize the chemical stripper after use with water or according to instructions.
Sandpaper Method
If you’re looking to remove paint and also smooth out minor blemishes, sandpaper might be the way to go. This method is a little more labor-intensive but can also give you a chance to prepare the wood for a new finish.
- Start with Coarse Grit: Use a coarse grit to remove most of the paint before switching to finer grit for a smooth finish.
- Sanding Technique: Always sand in the direction of the wood grain to prevent damage.
- Clean Surface: Wipe down with a clean cloth to remove dust particles after sanding.
Ready to Paint? Let's Go!
Taking the time to prepare your guitar for a custom paint job will pay off when you see the final results. Whether you’re looking to enhance its aesthetic appeal or even its tone, a thoughtful approach will set the stage for success. Remember to enjoy the process, unleash your creativity, and watch your guitar transform into a stunning piece of art that you’ll cherish for years to come.
So, grab your tools and get started—your masterpiece awaits!
Linked Product
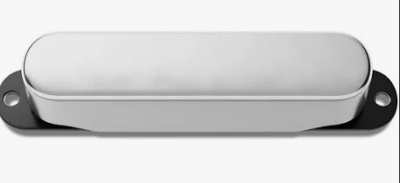
Mythic Odyssey Solstice Tele Neck SC
The Mythic Odyssey Solstice Tele Neck SC is designed for guitarists seeking a warm, articulate tone with vintage character. Its hand-wound construction and Alnico V magnets enhance harmonic richness, making it suitable for a variety of genres, including country, blues, and Americana. With a focus on consistent performance, this pickup provides the classic Tele sound that musicians can rely on for both studio and live settings.
View ProductRather have it done for you? Mythic Guitar Company handles custom guitar paint and finishing in the Austin shop, with pricing published up front.